last night i was thinking that i am posting tutorial very late.the reason is that i was trying to make the video of all sessions in ProE so it become easy to understand every thing.although i found some software at google and may be soon i will upload some videos.
ok now come to the topic.to create helical cut.
step # 1 open your ProE program. select new > solid part (name it “helical_cut”)
step # 2 select front plane and click at sketch
step # 3 click at circle tool and draw a circle of 100 dia.as you can see in fig.


step # 4 after sketching click at done button
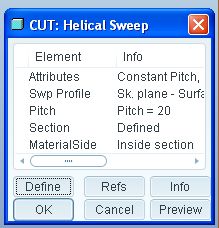
and the extrude this object by clicking extrude tool.set the extrude length to 200 or what ever you like.its just for practice.Now make solid part of your drawing and then go to insert > helical sweep > cut
the new dialog boxes will open don’t change any thing in begging but when when you hold this command you may vary it as you like.
for sketching profile select top plane as your working plane.
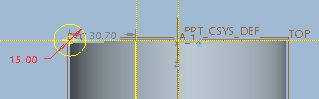
step # 5 now program will let you in sketching mode.draw profile for helical cut and then draw center line and then press done button .

step # 6 after completing step 5 program a new window will appear in which you have to put pitch for your cut enter it 20 or anything else not so big and not so small.

step # 7 after this program will let you again in sketching mode.now draw the section of your helical cut.in this case i draw a circle.remember the diameter of this circle should be less than the pitch value as you can see i put it of 15.
step # 8 after completing 7th step click at done button.and wait to back to the original window.
now you have completed all steps so click at ok button of dialog box
the program will genrate your desired cut.as in the following pic..

your feedback is required to “ME” .
Share it
Leave a Reply