Constraints in creo parametric is a set of useful tools when it comes out to make some conditional or restrictive sketching. Although Creo parametric offers constraints during sketching but manual constraint become useful when we have to make some complex geometry. There are total nine (9) types of constraints which are listed, with there expected symbols (will appear in sketching window), below:
1) Vertical (symbol “V”)
2) Horizontal (symbol “H”)
3) Perpendicular (symbol can be seen in following figure)
4) Tangent (symbol “T”)
5) Mid-point (Symbol “M”)
6) Parallel (symbol can be seen in following figure)
7) Coincident (symbol can be seen in following figure)
8) Equal (symbol “=”)
9) Symmetric (symbol “–> <–“)

We will go through each of them one by one and for this purpose first construct two lines within the sketching window then follow the instruction below.
1) Vertical Constraint
Select vertical constraint from ribbon and then click on the inclined line. This will make it vertical. In figure below line indicating with number “2” will go under this constraint.
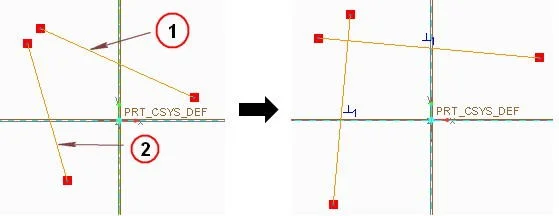
2) Horizontal Constraint
Select horizontal constraint and then click on the other inclined line. This will make it horizontal. In figure below line indicating with number “1” will go under this constraint.

3) Perpendicular Constraint
Make two random lines which are not perpendicular to each other as shown in figure below. Now click on perpendicular constrain and select the 1st line with labeled “1” and then select second line with labeled “2” by clicking on them. This will make them perpendicular.
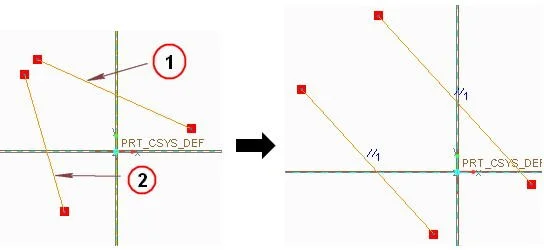
 4) Parallel Constraint
Make two lines at any angle but not at right angle to each, i used the same lines those I have shown in previous section, then click on parallel constrain and select the lines one by one.
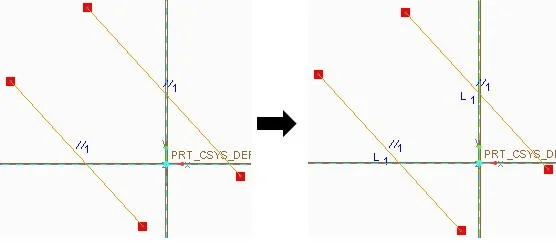
 5) Equal Constraint
it simply used to make two entities equal in selected dimensions. Simply draw two random lines or you can use the line which we just made parallel. After this click on equal constraint option and select the lines one by one. Note in right side figure the letter L1 is appearing in after applying constraint, indicating that these two line are equal.
 6) Tangent Constraint
To apply tangent constraint you need a curved shape first. For simplicity draw a circle and a line which is not intersecting to the circle. Then click on tangent constraint. first select the line and then select the circle. You can impose this constant in reverse order mean first select the circle and then select the line.

7) Mid-Point Constraint
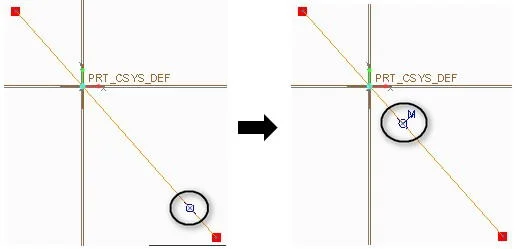
First draw a line and draw a point anywhere on the line as shown in fig below (left-side). Now click on midpoint constraint after it, select the point and then select the corresponding line. This will shift the point from current location to the middle of the line which can be seen in figure below (right side).
8) Coincident Constraint
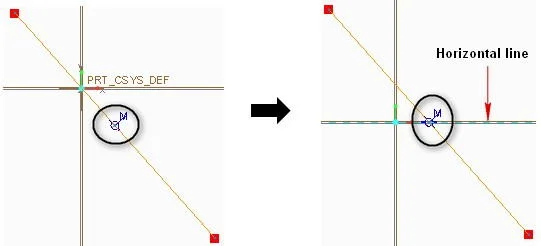
We will take help from the procedure of mid-point constraint for this exercise and will make mid-point coincide with the horizontal line/axis. After applying midpoint constraint,click on the coincident constraint and select the point which we want to make coincide. after selecting point, select the horizontal line. This will move the line up to make point coincide with horizontal.
9) Symmetry Constraint

This is quit useful constraint and can make life much easier while working in Creo parametric. To apply this constraint we need to draw a center line about which we will make our sketch symmetrical. First make some sketch, for our ease make a rectangle then create a center line. After this select the symmetry constraint option. Now select the center line by clicking on it and then select the two points on rectangle, which are highlighted, to make them symmetrical about the center line.
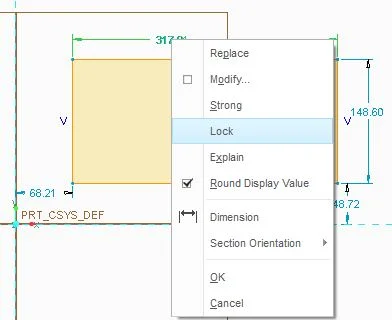
Locking The Dimension
if you want to constraint your sketch’s dimensions such that no change occur in it while you drag the sketch. A simple solution to this problem is to “lock” the dimension. to do this first you have to select the dimension which you want to lock and than “right click” at it. you will see option for lock.
Share it

Leave a Reply